Business, Creative Entrepreneurs, Interior Designers, Photographers, Tips & Tricks, Website Design, Wedding Professionals
Once your website visitors understand what you do, the next thing they’ll consider is how you do it. If your website doesn’t adequately explain how your service works, you might miss out on an opportunity to convert visitors into clients.
For service providers who sell high-ticket programs and services, it’s important to share how the process works. That way, they know what to expect when they’re making a significant investment in their business by working with you.
Ideally, your process will be simplified and streamlined on your website, sharing the most important steps in the customer journey. You can’t assume your client leads inherently know what will happen when they book your services, so you must give a sneak peek into your process.
Some entrepreneurs include the initial consultation call and onboarding workflow as a part of their journey. Others focus on what the process looks like once the project gets underway.
No matter which route you take, it’s better to lead with transparency when selling your services. The more you answer frequently asked questions on your website, the more clarity your audience will have in making a purchase decision.
Let’s talk more about how to highlight your process on your website so it sets expectations and answers any questions about how you produce your best work.
4 ways to highlight your process on your Showit website
Before you include your process on your website, you need to have it ironed out.
Start by listing every step in your process from someone filling out your project inquiry form to offboarding their project. If you missed any steps, you can go back and fill them in as you go.
You may also want to work with a business coach, strategist, or assistant to help you streamline your process as much as possible. I’m all for having a second pair of eyes on your business!
If you’re still figuring out your process, make sure to test it behind the scenes before you put it on your website. Then, if you need to make any edits to your process later, you still have a strong foundation.
With Showit, there are endless possibilities for sharing the ins and outs of your signature process. Today, I’ll be covering the four most common ways to highlight your process, and how you can make each strategy your own.
List each step
If you like simple solutions, nothing is easier than simply listing each step in your process. I like using a three-column layout for this process format, but you can play around with other layouts as well.
When designing Corry Frazier Photography’s website, we decided to keep her process simple and straightforward. Instead of using a phrase like “My Process” as the header, Corry felt like it would be more conversational to share “Here’s what happens next!” with her website visitors.

To add more visual interest, we also included a full-page photo in the background, which can be seen as you scroll through Corry’s Portrait Photography sales page.
This photo shows some of the seniors and other clients she’s been able to take photos of over the years, all in one place. The vibrant colors really catch your eye and make any visitor want to continue reading about her work and process.
You might also decide to use icons, illustrations, or photos to represent each step in your process. Have fun with it, and make sure your process pops!
Share your process timeline
If you want to guide your visitor’s eye as they scroll down your Services page, you may want to try sharing a timeline of your process. Timelines are used to share the step-by-step process clients will take when working with you.
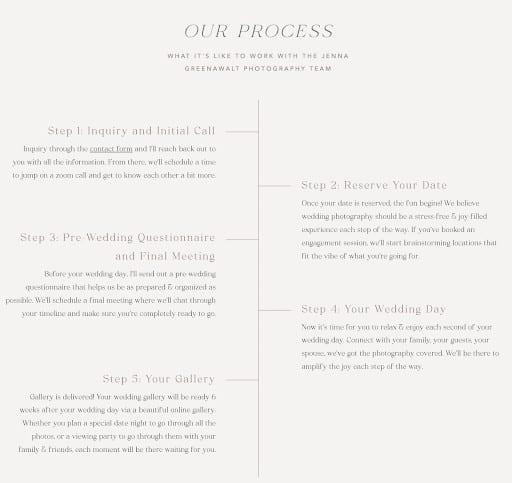
For Jenna Greenawalt, we wanted to make her process feel approachable and easy to follow.
Since Jenna is a wedding photographer, we knew it would be important to share what happens even before brides decide to book her. That’s why we led with the initial steps of sending an event inquiry and meeting for a call before officially reserving her new client’s wedding date.

After their date is reserved, they can expect to receive a pre-wedding questionnaire and walk through their wedding day timeline. This is a great example of how to describe what happens in each step while keeping your content short and sweet.
To take this one step further, you could also create an interactive timeline that reveals each step when clicked. If you like minimal design, you may want to create a timeline with more white space that reveals each step as you scroll through the page.
Highlight stunning photos
To make your process even more eye-catching, think about adding beautiful photos of your work within your timeline. This will help your visitors begin to visualize what it might look like for them to work with you.
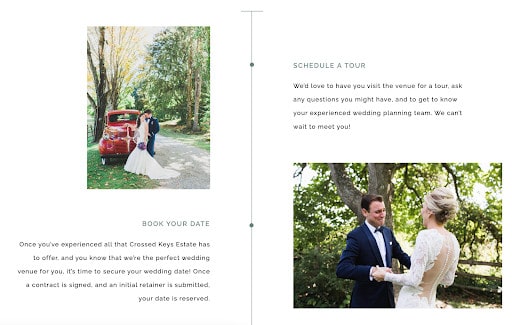
Rather than asking them to imagine the possibilities, why not show them an example? Clients like Crossed Keys Estate are able to easily show off their venue by including professional photographs within their process timeline.

While we could have used photos that captured the venue itself, we thought it would be a better idea to show couples enjoying wedded bliss at the venue. That way, visitors can visualize themselves in the images.
The horizontal photo on the right-hand side of the timeline is static, but we used an automatic slideshow feature for the vertical photo on the left.
This allowed Crossed Keys Estate to showcase a few beautiful photos of the gorgeous grounds of the estate without distracting from the information and wedding photos. It gave us the best of both worlds!
You can use the same strategy when highlighting photos in your process.
If you’re a service provider, it could be even more effective to show photos of you working inside your process. It’s even better if a few of the photos feature you collaborating with a client. This strategy may require you to invest in a brand photoshoot, but it’s so worth it.
Keep it minimal with a slideshow
When displaying your process on your website, less is more. By condensing the length of your content and only showcasing the most high-level steps, you’ll be able to share your process in a way that’s easy to understand.
When we created a process timeline for Radian Photography, we thought it would fit their more minimal website design to use a slideshow feature. Instead of listing each step, we only showed the first step and concealed the other five.

That way, visitors can click through the slideshow if they want to learn more about Radian Photography’s process, but they can also keep scrolling through their site.
Since many entrepreneurs leave out their process because they don’t want to lengthen the content on their website, this minimal design approach might be a good compromise.
You can look for a Showit template that includes a similar slideshow layout, or work with a designer to create a custom website. No matter which route you take, you’ll create a more clean and streamlined website by using this strategy.
Ready to showcase your process on your website?
Your website visitors are going to thank you for sharing an inside look into your process!
By sharing your process on your website, it should help you:
- Reduce the number of questions your client leads are asking
- Streamline conversations during your consultation calls
- Show the immense value of how you produce your best work
- Set expectations of what’s included in your process (and what isn’t)
- Show what’s possible when someone decides to work with you
There really are no downsides to including your process! All you need to do is choose one of the strategies above after nailing down your process.
I can’t wait to see the “how” behind your work!


