Business, Creative Entrepreneurs, Photographers, SEO, Showit, Tips & Tricks, Website Design, Website Platforms, Wedding Professionals
What if you could make massive improvements to your website’s SEO in a few minutes?
Um, yes please! Who wouldn’t love the sound of that?
Marketing experts make SEO out to be this complicated and time-consuming thing, but trust me, there is a simpler way to improve your SEO.
It starts with making the small tweaks first.
4 easy ways to improve your SEO
These SEO recommendations don’t take much time but they will help you generate more leads, attract more visitors, and ideally move up in Google’s search result rankings.
The best part is that all of these tweaks can be completed while you watch your favorite movie or have a quick co-working session with a close business friend. I don’t know about you, but those are the kind of business tasks I love!
Are you ready to get started?
Edit your page titles
One of the first things someone will see in a Google search results page is your page title. It shows up in blue (or purple if the visitor has already visited the page before) and appears larger than any of the other text.
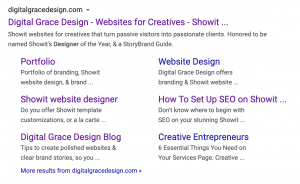
Some website builders have a default format for page titles that makes it look clunky or hard to read. Trust me, I’ve seen it all!
Let’s throw out the default methods and go after the right one. The best way to learn about what your page title needs is to use an example, like your Home page.
In your Home page, it is a good idea to do basic keyword research to decide what your target keyword will be for the page. I recommend choosing only one for this page and to make it stand out from your other pages.
Let’s say you’re a wedding florist who lives in New York City working under the company name of Entranced. When you try to write your page title for your Home page, you might want to use a keyword you know local brides are already searching for like “nyc wedding florist” or “nyc wedding floral design.”
This keyword should ideally be in your page title along with your company name.
Here’s what it could look like in action:
Entranced Design: NYC Wedding Florist Based in Soho
Entranced: NYC Wedding Floral Design for Modern Brides
Do you see how these two examples include the main keywords we decided on above but are a little different? You can complete these steps for all of your website pages, starting with your Home, About, Services, and Contact pages.
That’s all there is to it.
Next up, meta descriptions!
Create custom meta descriptions
Meta descriptions go hand-in-hand with your page title because they are frequently seen together on Google’s search result pages. Think of them as two peas in a pod. You don’t want to make edits to one while forgetting the other.
Your meta descriptions should include the main keyword you are hoping to rank for along with more information about who you are, what you do, and who you serve. Make sure the meta description tells the person what they will learn if they visit the page.
You don’t want to use duplicate meta descriptions. Each one should be written in a unique way. Since every page on your website has a different goal, it makes sense for your meta descriptions to be different, too.
You’ll want to keep your meta description around 120-150 characters (not words!). It is relatively short, meaning you want to include only the most important information.
Let’s use the same wedding florist example from above.
A meta description for the Home page could look like:
Based in New York City, NY, we create stunning wedding floral designs for modern brides who want their wedding day to be a night to remember.
You can play around with the format. Just make sure your keyword, location (if you serve clients locally), and any other necessary details are included for more context.
Add simple alt tags to your images
When you upload an image to a new website page or blog post, you’ll notice a window pop up that shows a preview of the image with a few text options. The first says “SEO title” and the second says “Description.”
If you leave these text boxes blank or skip over them, you could be hurting your SEO without knowing it. Luckily in Showit’s website builder, it’s easy to optimize your images for better SEO.
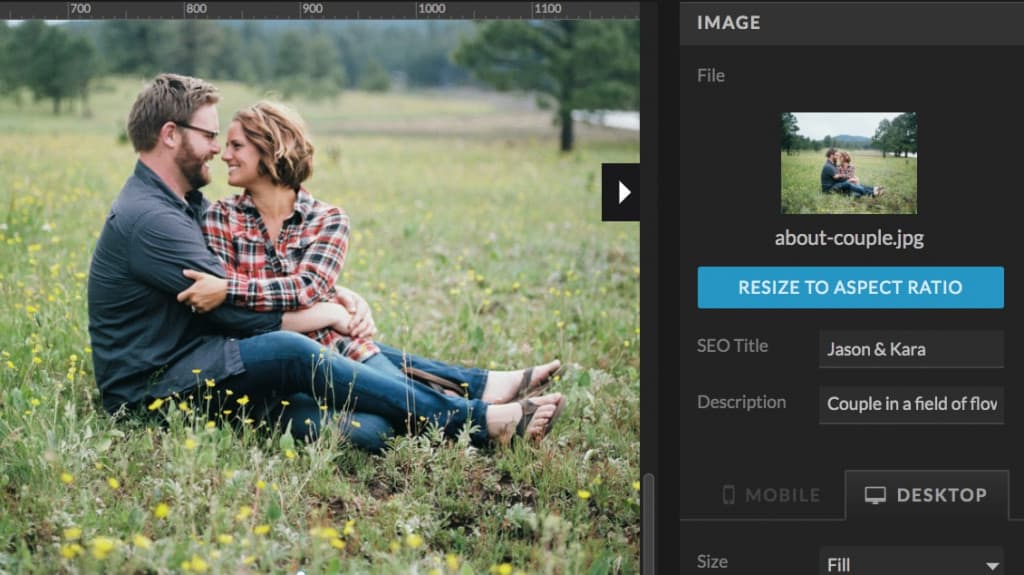
This quick SEO tweak will only take a minute or two but it will make a big difference. Locate the “Description” box again. This is also considered your image’s alt tag or alt text.
An alt tag is simply a sentence or phrase that describes what is happening in the photo.
This helps visually impared visitors who scroll through your website to better understand what is on the page. It also gives Google bots added context when they crawl your website.
Too many people use this description as a place to list out all of their keywords (frequently called keyword stuffing), but this is NOT a good practice. When Google bots crawl your website, they want to see a full explanation of what’s going on in the image. Keyword stuffing will actually decrease your reputation with Google.
Here’s a good example to show you how to write an alt tag for the image below (taken from Unsplash’s stock photo site):
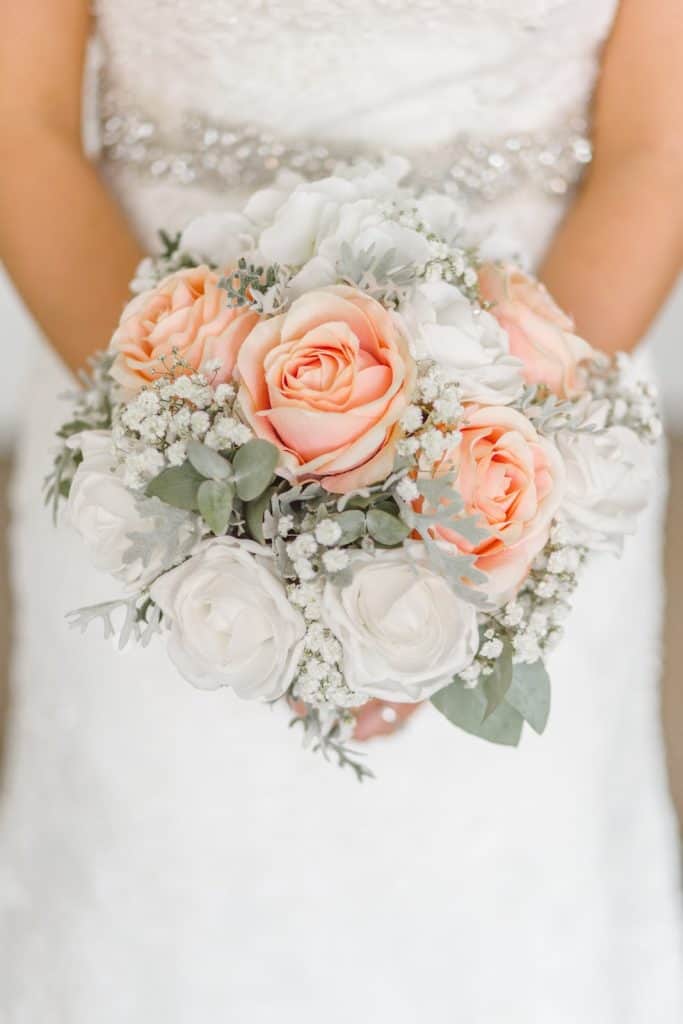
A bad alt tag would be “floral bouquet,” but an even worse alt tag would look like “floral design new york city soho florist brooklyn flower shop queens harlem wedding floral bouquets.” See what I mean when I say keyword stuffing? Yikes!
A much better alt tag would be “bride holding peach and white floral bouquet.” It says exactly what is happening in the image in a simple, easy-to-read sentence. Seriously, that’s all you need!
I recommend tackling the new alt tags on your core website pages before moving on to your blog post images. Keep a checklist as you go through each page on your website so you can stay up-to-date with which images you’ve already added alt tags to.
This is a really great tweak to make when you are binging reruns of your favorite show on Netflix or listening to an album release from a musician you love. You’ll be surprised how many of these you can get done in a single sitting!
Put keywords into your blog post URLs
When someone visits your blog and clicks a “read more” button on a blog post preview, it will direct the visitor to the specific blog post. This is done through its URL.
Like most entrepreneurs, my blog post URLs look something like this:
domainhere.com/blog/insert-title-here
Of course, this isn’t a real link but it shows a general template you can use for blog post URLs. What you insert into the title, however, is what we’ll talk about.
Here is the good, not-so-good, and very bad of blog post URL formatting:
Good: domainhere.com/blog/nyc-wedding-checklist
Not-so-good: domainhere.com/blog/what-it-takes-to-create-your-dream-wedding-in-new-york
Very bad: domainhere.com/blog/8jd18390043ndjd-452938404
What’s different about the good version of a blog post URL than the other two examples? First off, it doesn’t have a random collection of numbers and letters. This is sometimes the default option for website building platforms so be sure to customize your URL if this is the case.
Secondly, the good blog post URL doesn’t include a very long explanation of what someone will find in the blog post. Instead, it features a URL that is easy to find and even easier to read.
It also includes the keyword “cleveland wedding checklist,” which can be used as the targeted keyword you want the blog post to rank for. This tells Google bots what keyword they should be looking for when they crawl through your blog posts.
This is a great thing to keep in mind for how you structure blog post URLs or website page URLs in the future.
Please note if you decide to change the URLs to old blog posts you have published, you might want to create a redirect link from the old URL to the new one. You can do that by following these redirect link guidelines.
This action is only needed for your most well-performing blog posts or those that connect with a keyword. If you have blog posts that are purely personal or don’t tie into your keywords, you can leave them untouched for now since they don’t need your immediate attention.
If redirecting links feels too time-consuming or you don’t want to deal with it on old posts, you can simply keep this tweak in mind for future blog posts.
Ready to take the next step?
These four tweaks will give you a headstart on improving your website’s SEO, but maybe you are looking to make more leaps and bounds. Since SEO is a long-term growth strategy, what you learn today can pay off BIG time tomorrow.
If you want an easier way to learn about SEO without the confusing jargon and overwhelming explanations, look no further than my affordable course, Simple Showit SEO.
It features 14 bite-sized video lessons with a 25-page workbook to help you vastly improve how your website performs in search in less time.
Want to learn more? Click here to check out the course to see if it’s right for you!
While you’re here, why not snag our free Showit SEO Checklist to ensure you don’t miss a thing when you set up your website SEO!
Recommended reading: SEO resources
- 5 Easy Steps to Improve Your Wedding Blog SEO
- SEO 101 for Wedding Businesses & Creatives
- Beginner’s Guide to SEO from Moz
- A Complete Guide to SEO from Search Engine Journal